

When you start teaching Snap Words to students, it can be overwhelming. There’s so much to use and do and it can be hard to get a good routine down. Luckily, I’ve been teaching Snap Words for a while now, so I can share with you all of my tips and tricks for teaching sight words.
The first thing you need to decide, is whether you are going to teach your whole class, some of your kids, or only one of your kids at a time. As an upper elementary teacher, I only ever teach sight words to a small group or 1:1. It’s just not appropriate to teach a classroom full of 4th graders sight words. I specifically target students who don’t know their sight words, are visual learners, and who have not found success with other strategies. If I was teaching a younger grade, like kindergarten, then I would consider teaching Snap Words to the entire class.
A BIG mistake I see people making when teaching sight words, is asking students to guess what they think the word is. This is a mistake, because often the first word they say/think is what they remember. It is so much easier to teach the word correctly, rather than fixing a misconception. For this reason, every time I introduce a Snap Word, I start by saying “Remember, my turn first”. Then, I show the word card, say the word, and point to the students to indicate it is their turn to say the word. They are only allowed to say exactly what I say, they can’t tell me a personal story about the word or use it in a sentence (yet). I do this several times. I point to the word and say it, then point to the students and have them say it. Once we’ve done that about 5 times, I move on to the next step.
Next, I explain the visual representation to them. Sometimes, these are pretty obvious, other times they require some more explanation. After I’ve explained the card to them, then I say and have them repeat the word a few more times. After we’ve done “My turn first” several times, I ask if there is anything else they notice visually about the card.
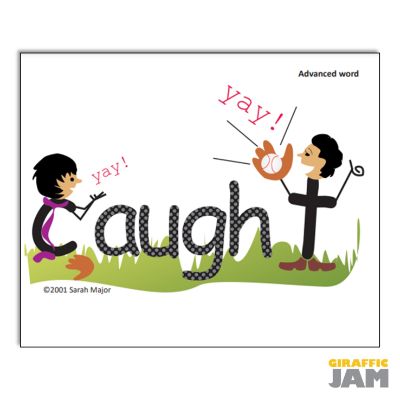
For this card, we would talk about how the ball was ‘caught’ by the player. I would also point out the ‘augh’ spelling in the middle, because this pattern will occur in other words students see. Students may want to tell me a story about a time they caught something, or maybe they will point out that the letter ‘t’ is has a catchers mitt to help him catch the ball.
Snap Words has students use literal motions to represent the words. For instance, this card has students pretend to catch a ball with a mitt. I think that strategy is effective and helps secure not only recognition of the word, but understanding of the word.
However, with that said, I’ll be honest that I don’t use the literal motions for the words. Instead, I teach my students sign language to represent the words. The reason I do this is two parts: 1) my kids know what most of the words mean, they understand what ‘caught’ means and 2) it is much more discrete to show them a sign for a word when they approach it in a text rather than to show them the visual cue of pretending to catch something. Remember, I teach older students who still don’t know sight words. They are already embarrassed when it’s their turn to read. By teaching them sign language, they can discretely look at me and I can show them a sign to help them remember a word. This is less invasive than miming catching a ball. Most of the time, the other students in the room don’t even notice what we are doing!
This is also done with a ‘my turn first’ mentality. I begin by saying the word and making the movement. I do this several times before inviting students to say the word and make the motion with me.
Remember, I’m not explicitly teaching them sign language. I’m not ever grading or assessing their ability to understand or model sign language. This is purely done as another imprint method. Often, the sign language is just another cue in the form of muscle memory that as their hands move in a certain way, they remember the word that matches. And, we certainly don’t get into skills such as ASL grammar or syntax.
The last cue is the auditory cue. This is similar to the discussion that we had during the visual portion, and heavily relies on the picture. For this card, the auditory cue is, “I’m happy that he CAUGHT the ball.” I heavily emphasize the word caught as I say it. After a few of ‘my turn’, I invite students to repeat the saying with me. We then move to saying the entire sentence and doing the kinesthetic motion when we say the word in the phrase.
As students master the auditory, visual, and kinesthetic imprints it’s time to start flipping the cards to the ‘normal’ version. I never flip all the cards at once, instead I usually flip no more than two. I also don’t make a big deal about it. When I have the cards, I simply flip a card or two and mix them back in the deck. If students have mastered the visual cues, they should still be able to subconsciously ‘see’ the images on the normal side. It should come naturally to them.
PS – Don’t be in a rush to flip cards, especially at first. You want students to feel comfortable before you start flipping. It’s important that they feel successful and are proud of themselves, rather than rushing to flip and having them uncertain. I’d rather spend two weeks on a card and them know it then to spend two days on it and they get it wrong half the time.
One of my favorite things to do is to teach kids to read an entire phrase after just learning about 5 words. The first words are “a”, “in”, “the”, “by”, and “on”. First, I take a post it note or two and write a magic word on each of them. Usually it’s something seasonal, and silly, like for instance “pineapple” and “pool”. I explicitly tell students what the words on the notes are. I also like to use two different colors so that they can remember ‘pineapple’ is on yellow and ‘pool’ is on blue. Then, I use the Snap Words cards and my post it notes to make some silly phrases. For instance, “pineapple is in the pool”. Kids love reading these silly phrases. As they master the visual side of the Snap Words, I slowly flip the cards over. Eventually, they are reading the entire phrase in standard form!
The great thing about Snap Words, is you can teach sight words as fast or as slow as you want. Some of my kids can learn 3 words a day. Others, we go slower and only learn three a week. I work with students in groups based on the amount they can learn comfortably. This allows my kids who are ready to move on the opportunity to move on, and the kids who aren’t can keep working on the same words!
I have a Snap Words Basket which includes all of my cards and other materials. I try to keep my words separate by students/groups. This means I have a pile of cards for my 3rd graders, a pile for 4th graders, and a pile for 5th graders. In other years, I’ve had individual piles of cards for each student.
This year, (I wish I had a picture!) I made my morning meeting board using Snap Words. I punched holes in the top corner of each of the cards for the months, days of the week, seasons, colors, and numbers. Then, I put eye hook magnets on the board and hung the cards. This made it super easy to have a morning meeting and use the Snap Words. Kids learned these words without any extra instruction!
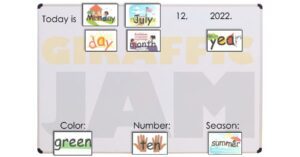
Ok, confession. This is obviously a digital mock up of my whiteboard – it’s not a real picture! I have all of my stuff packed up, because I’m moving classrooms so I couldn’t take a picture of the real thing. But, this is how I set up my dry erase board!
Snap Words make it so easy for your students to learn sight words. You can easily teach students sight words in a way that is easy for students to learn many words in a short time period. They can be taught in a variety of ways and introduced to your students in so many different contexts!
3 Responses