
Want to know how to set up Todoist to maximize effectiveness in your classroom? Looking for a detailed how-to guide on how to use Todoist in your classroom? I’ve got you! I love to use technology in my classroom, but I know that it can be hard to learn something new. So come along on this journey, while I show you step by step directions on how to use Todoist in your special education or general education classroom! Whether you are a new teacher looking for tips, or a veteran teacher who wants to try something new – I’ve tested the strategies and found the shortcuts so you know how to easily use Todoist. Let’s go!
(Remember, that I try to keep my content up to date, but Todoist is always changing. If you see something here that doesn’t quite match up with what you’re seeing on the website, please let me know so I can get it updated!)
Todoist Project Lists
Todoist has so many great features, and project lists are what I like to consider the starting spot. Project lists are an easy way to keep things organized in Todoist. You can create several different project lists, so that it’s super easy to see filter and look at specific lists. At school? Hide your personal list. At home, don’t even worry about seeing that dread of having a full list of school things to do. Quickly filter to exactly what you want to look at with Todoist project lists!
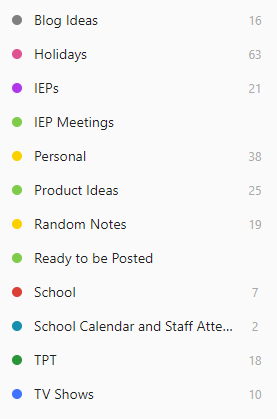
Look at all of the Todoist project lists I have set up! It’s super easy for me to see which list an item came from!

Ideas to Use Todoist Project Lists in the Classroom
- Create different lists for different aspects of your classroom:
- Homework to print
- Lessons to plan
- Things to grade
- Parents to call
- Meetings
- IEPs to write
- PD
- School calendar (it’s super satisfying to put all of those delays and early dismissals in there!)
- Staff birthdays
- Staff attendance (I just scribble a quick note if my partner says she’s taking a day off – this helps me as I’m planning and doing other things on my list to know that I might be with a sub or be short handed that day!)
How to Set Up Todoist Project Lists
- On a Computer:
- Click the ‘plus sign’ on the left hand side of the screen by the word ‘projects’
- Type in a name, pick a color, and decide your view style – don’t worry, nothing is permanent you can always edit it!
- On an Apple Device:
- Go back to the main menu
- Click the ‘plus sign’ on the right hand side of the screen by the word ‘projects’
- Type in a name, pick a color, and decide your view style – don’t worry, nothing is permanent you can always edit it!
Video on How to Set Up Todoist Project Lists
I know, it’s way easier to watch a video on setting up Todoist project lists than it is to read the directions. So, if watching videos is your jam – hit that video above!
FAQ’s about Todoist Project Lists
- What are Todoist Project Lists?
- Think of them as folders to help you organize. You can always add more (or delete them). They help you keep track of which items belong to which projects!
- Why are Todoist Project Lists color coded?
- Well, besides the obvious that it looks pretty?
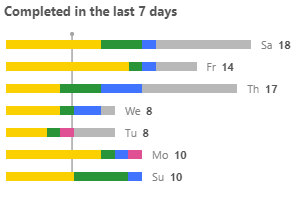
- Todoist will make you a visual to show you how much stuff you are getting done! These colors coordinate to each of my list colors. Yellow is my ‘personal list’ and green is my ‘TPT list’. That little sliver of pink? Is my school list – but since I’m writing this post over the summer, it’s fair that I haven’t done a lot of school stuff!
Todoist Project Lists – Next Steps:
Now it’s your turn! Have you done the following?
- Set up an account
- Decided on the project lists you want
- Create the lists, name them, select a color, and a view
- Tried scheduling an item to a list\
- Click the box where it says ‘inbox’ to switch it to another list
- Or, use a # when typing the item – for instance, “wash the dog #personal” will put that item on my personal project list!